
TelnetBible.com
King James Bible Server
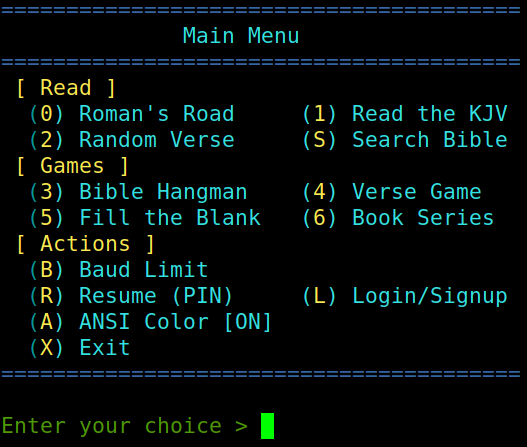
| [0] | Road to Salvation | A guided presentation through Scripture showing God's plan of salvation. |
| [1] | Read the Bible | Navigate the complete KJV by Testament, Book, Chapter, and Verse. Save your place with a PIN. |
| [2] | Random Verse | Display a random verse from anywhere in Scripture. Explore forward and backward. |
| [S] | Search Bible | Full-text search across all 66 books with paginated results. |
| [3] | Bible Hangman | Classic hangman with Biblical Books, People, or Cities. |
| [4] | Verse Game | Identify a verse's reference from four multiple-choice options. Explore the verse after each round. |
| [5] | Fill the Blank | Complete the missing word in well-known Bible verses. Explore the verse after each round. |
| [6] | Book Series | Arrange four books of the Bible in their correct canonical order. |
| [L] | Login / Sign Up | Create an account or log in. New accounts require SysOp verification. |
| [B] | Baud Rate Limit | Simulate vintage modem speeds from 300 to 230,400 baud. |
| [R] | Resume Reading | Return to where you left off. Guests use a 5-digit PIN; users pick from bookmarks. |
| [A/P] | Toggle Color | Enable or disable ANSI or PETSCII color output. |
Available after logging in. Press [U] from the Main Menu.
| [C] | Chat | Real-time BBS-style terminal-to-terminal chat. |
| [B] | Bulletins | Community bulletin board with multi-line editor. |
| [E] | Private messaging between registered users. | |
| [M] | Bookmarks | Save your place in the Bible and return anytime. |
| [W] | Who's Active | View connected users. Send chat requests or broadcast announcements. |
| [F] | File Transfer | Upload and download files via XMODEM protocol. |
| [S] | Statistics | View server uptime, visitor counts, user totals, and file stats. |
| [P] | Edit Profile | Update your alias, name, email address, or password. |
| [X] | Exit | Disconnect from the server. |
Vintage Hardware
Commodore 64 (PETSCII), Apple II, IMSAI 8080, Altair 8800, and other period terminals. Terminal type is auto-detected.
Modern Terminals
Any ANSI-compatible terminal emulator on Windows, macOS, and Linux. Connect with your preferred telnet or SSH client.
Telnet is not enabled by default on most modern operating systems. SSH requires no additional software.
Linux (Debian / Ubuntu)
- Install telnet:
sudo apt install telnet - Connect via Telnet:
telnet telnetbible.com 6400 - Or connect via SSH:
ssh guest@telnetbible.com
Linux (Fedora / RHEL)
- Install telnet:
sudo dnf install telnet - Connect via Telnet:
telnet telnetbible.com 6400 - Or connect via SSH:
ssh guest@telnetbible.com
macOS
- Install Homebrew if needed:
/bin/bash -c "$(curl -fsSL https://raw.githubusercontent.com/Homebrew/install/HEAD/install.sh)" - Install telnet:
brew install telnet - Connect via Telnet:
telnet telnetbible.com 6400 - Or connect via SSH:
ssh guest@telnetbible.com
Windows 10 / 11
- Open Control Panel
- Select Programs, then Turn Windows features on or off
- Enable Telnet Client and click OK
- Open Command Prompt or PowerShell and run:
telnet telnetbible.com 6400 - Or connect via SSH:
ssh guest@telnetbible.com
PuTTY is a free terminal emulator. It supports both Telnet and SSH connections.
Linux (Debian / Ubuntu)
- Install:
sudo apt install putty - Launch PuTTY and set Host Name to
telnetbible.com, Port to6400 - Select Connection type: Telnet and click Open
Linux (Fedora / RHEL)
- Install:
sudo dnf install putty - Launch PuTTY and set Host Name to
telnetbible.com, Port to6400 - Select Connection type: Telnet and click Open
macOS
- Install via Homebrew:
brew install putty - Launch PuTTY and set Host Name to
telnetbible.com, Port to6400 - Select Connection type: Telnet and click Open
Or download directly from chiark.greenend.org.uk.
Windows
- Download PuTTY from chiark.greenend.org.uk
- Run the installer or use the standalone executable
- Set Host Name to
telnetbible.com - Set Port to
6400 - Select Connection type: Telnet
- Click Open
All Platforms
- Set Host Name to
telnetbible.com - Set Port to
22 - Select Connection type: SSH
- Click Open
- Enter username
guestand passwordguest
8080 instead.
SSH is built into Windows 10+, macOS, and Linux. No additional software required.
Linux, macOS, or Windows
- Open a terminal (Terminal, Command Prompt, or PowerShell)
- Run:
ssh guest@telnetbible.com - Accept the host key fingerprint if prompted (type yes)
- Enter the password:
guest
ssh -p 8080 guest@telnetbible.com
ssh YourAlias@telnetbible.com
Host Key Rejected? How to Fix It
When you connect via SSH for the first time, your computer saves the server's host key fingerprint. On future connections, SSH verifies that the key matches. If it doesn't, you'll see a warning like:
WARNING: REMOTE HOST IDENTIFICATION HAS CHANGED!
This means the key your computer has on file no longer matches the key the server is presenting. There are a few legitimate reasons this can happen:
- Server reinstallation or migration — The server was moved to new hardware, reinstalled, or its SSH host key was regenerated during maintenance.
- Server software update — An SSH server update may have regenerated the host key.
- Connecting on a different port — If you previously connected on port 22 and now use port 8080 (or vice versa), the stored key may differ.
Removing the Old Host Key
To clear the saved key and allow a fresh connection, run one of these commands:
- Standard port (22):
ssh-keygen -R telnetbible.com - Alternate port (8080):
ssh-keygen -R [telnetbible.com]:8080
Then reconnect normally. SSH will prompt you to accept the new host key. Type yes to save it.
Windows Users (PuTTY)
PuTTY stores host keys in the Windows Registry. If you see a key mismatch warning:
- PuTTY will display a dialog asking if you want to update the cached key
- If you trust the connection, click Accept to save the new key
- To manually clear it, open Registry Editor (
regedit) and delete the entry underHKEY_CURRENT_USER\Software\SimonTatham\PuTTY\SshHostKeys
“Thy word is a lamp unto my feet, and a light unto my path.”Psalm 119:105